Authentication process
The Runscope API uses OAuth 2.0 for authentication. OAuth2 is a protocol that lets applications ask for authorization to an API Monitoring account without getting their password. Access tokens can be limited to specific types of data, and can be revoked by the user at any time.
Create applications
To use the API, you must first create an application.
Applications must have a name, website URL, and callback URL. Once you create an application you'll be given a client ID and a client secret to use in the authorization flow.
When you create the application, we automatically authorize your own account for it and generate an access_token for your own use. This makes it easy to start using the API for personal use without building a web flow.
To build applications that access data on other API Monitoring accounts, send users through the Web Application Flow.
Send users through the web application flow
Step 1: Redirect to authorization dialog
To begin the OAuth flow, redirect a user to the authorize URL.
Authorize URL
curl 'https://www.runscope.com/signin/oauth/authorize'Response302 Found
Location: https://www.runscope.com/signin/oauth/authorize?client_id=XXXXXX
				&redirect_uri=https://example.com
				&response_type=code
				&scope=api:read%20messsage:write
				&state=random_value
Authorize URL parameters
Attributes
-
client_idstringrequired
The client ID of your application
-
redirect_uristringrequired
The callback URL of your application. After authorizing your application a redirect will be made to this URL with an authorization code
-
response_typestringrequired
The desired grant type, as per the OAuth 2.0 spec. The only current valid value is response_type=code
-
scopestringA space separated list of scopes. Valid scopes are listed below
-
statestringAn unguessable random string. This state will be sent back to your application's callback URL. It should be used to protect against cross-site request forgery attacks on your application
Available scopes
Scopes
-
api:readstringrequired
Default read access. Allows you to see most of the user's account information including message streams and buckets
-
bucket:auth_tokenstringAllows you to read authenticated buckets
-
bucket:writestringAllows you to read all bucket information, including authenticated buckets
-
message:writestringAllows you to create new buckets on behalf of the user (up to their plan limit)
-
account:emailstringAllows you to read the email addresses of user accounts
-
team:readstringAllows you to read team details such as lists of team members and external service integrations
-
test:readstringAllows you to read the details of API tests
-
test:writestringAllows you to update and delete details of API tests
The following confirmation screen appears:
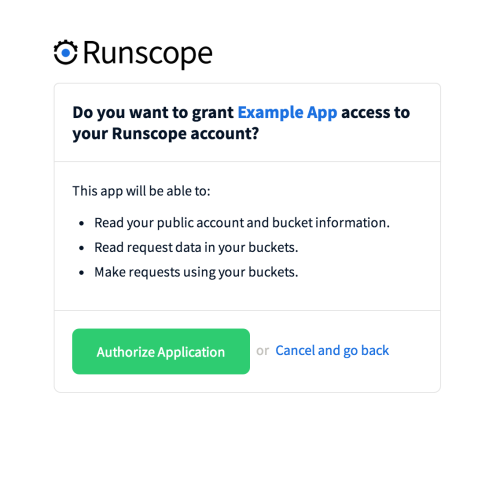
After clicking Authorize, they are redirected to your callback URL.
Step 2: We request your callback URL
Once the app has been authorized, Runscope will redirect the user back to your callback URL with an authorizaton code included in a code URL parameter. If the user declines to authorize your app, a redirect to your callback URL will be issued with a error=access_denied URL parameter.
Authorization codes are only valid for a short time, you must exhange the code for an access token with 60 seconds or you will have to send the user through the authorization flow again.
Sample callback URL request (authorization granted)
curl 'https://example.com/oauth_callback?code=38a6c89f-7c15-4c95-ab48-8b733849958b'Step 3: Exchange code for access token
You may now use this code to retrieve an access token from the access token URL.
We will return a response with an access_token. This access token may be stored and used until the user revokes access to your application.
Access token url
curl 'https://www.runscope.com/signin/oauth/access_token' \
    -X POST
    -H 'Content-Type: application/x-www-form-urlencoded' \
-d 'client_id=12345678-1234-1234-1234-1234567890ab&client_secret=12345678-1234-1234-1234-1234567890ab&code=12345678-1234-1234-1234-1234567890ab&grant_type=authorization_code&redirect_uri=https://my.domain.com'Response200 OK
{
    "access_token":"43541d4a-c4b0-43b1-bd26-33231e06b71d",
    "token_type":"bearer"
}
Access token parameters
Parameters
-
client_idstringrequired
The client ID of your application
-
client_secretstringrequired
The client secret of the application
-
codestringrequired
The code you received in your callback URL
-
grant_typestringrequired
The only valid value is authorization_code
-
redirect_uristringThe callback URL specified for this application