BlazeMeter TeamCity plugin
BlazeMeter has a plugin to TeamCity to simplify your load testing needs. You only need to connect your BlazeMeter account to TeamCity, configure a simple build step and you are good to go. You can configure TeamCity to run the BlazeMeter build step whenever you want, and the test will start with your pre-configured settings.
- Install BlazeMeter plugin for Teamcity
- Configure BlazeMeter plugin for TeamCity
- Configure a build using BlazeMeter plugin for TeamCity
- Configure your proxy server settings in TeamCity
- Pass/Fail build criteria
- Logging
- Changelog
What is TeamCity
TeamCity is a user-friendly continuous integration (CI) server for professional developers and build engineers working on .NET, Java, and Ruby projects.
Install BlazeMeter plugin for Teamcity
- Download the TeamCity (JetBrains) plugin.
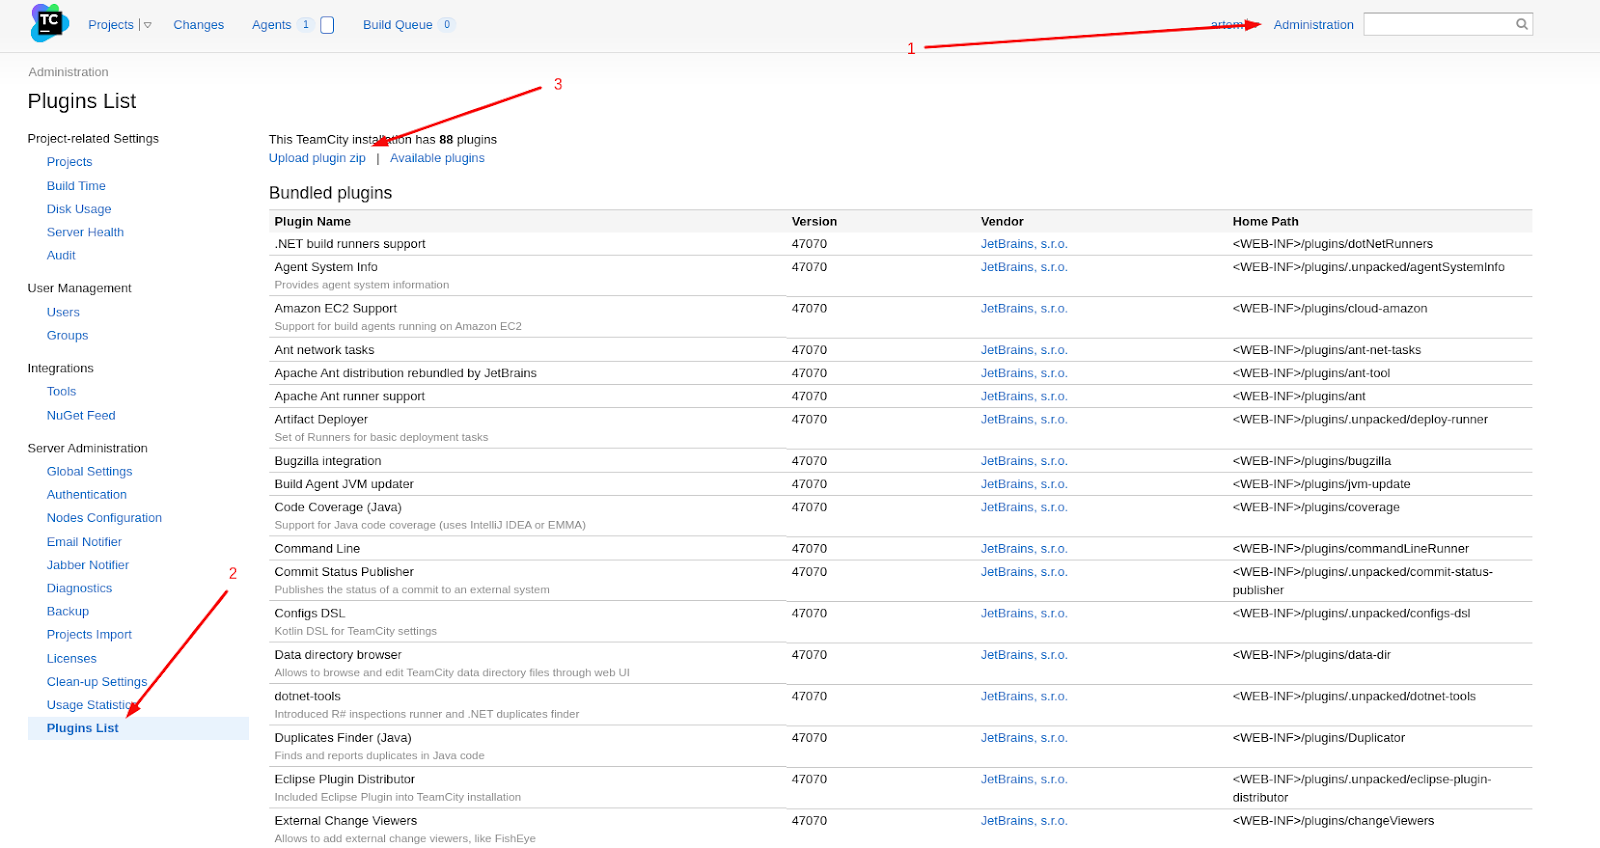
- Here are two different ways to install the plugin
$ ../TeamCity/bin/teamcity-server.sh stop
$ cp blazemeter.zip /Users/Blazy/.BuildServer/plugins
$ ../TeamCity/bin/teamcity-server.sh start
Configure BlazeMeter plugin for TeamCity
First, Get the BlazeMeter user key. How to get the API Key?
- The plugin's configuration page is accessible in TeamCity from the ‘Administration’ section, in the ‘BlazeMeter’ link on the left side of the screen.
- Please set the 'BlazeMeter URL' field to https://a.blazemeter.com
Configure a build using BlazeMeter plugin for TeamCity
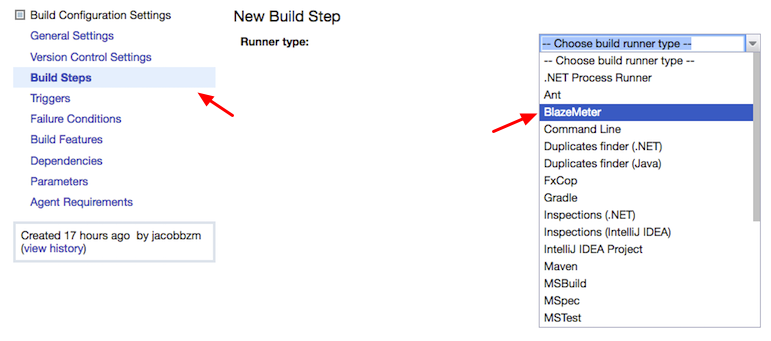
Add a new build step with type 'BlazeMeter'.

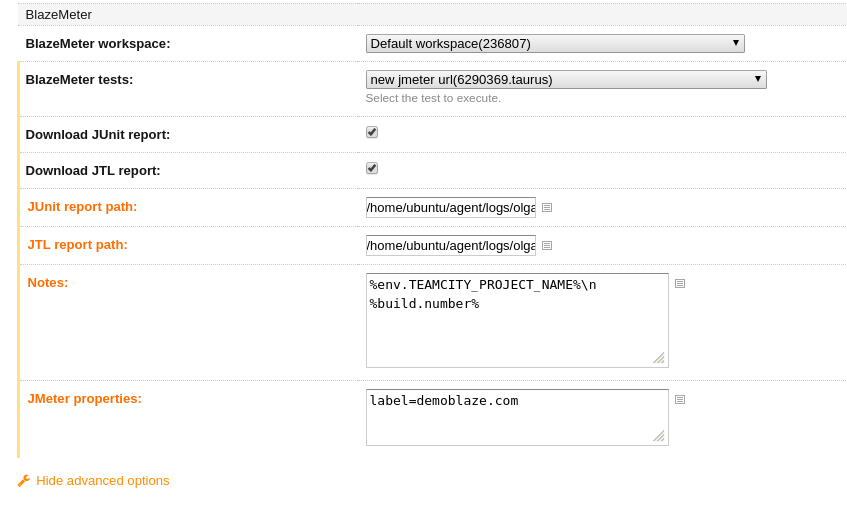
- If your keys were pre-configured in the global settings, you will now see all your tests in the drop down. Select a test to run.
- Set the path for JUnit/JTL files.(Optional)
- Add notes to your test (Optional). Notes will be visible at test report dashboard after starting the test. Note, that there is an ability to use TeamCity predefined variables, e.g. %teamcity.version% More information on this is available here
- Add JMeter Properties to your test.(Optional) Format of session properties: key=value,key1=value1,key2=value2. Sending properties for test session is currently not supported for Taurus & Multi tests.
- Make sure to ‘Save’ your settings
- When the test finished, you will see a summary of the build. Also you will find the ‘BlazeMeter Test Report’ tab on your build page. It contains the link to the BlazeMeter report page.
The TeamCity agent will wait for test results before being freed up to run any other task. This is a limitation of TeamCity and not the plugin. The only way to work around this limitation is to have multiple agents assigned to your test pool.
JUnit/JTL reports
The plugin downloads two kinds of reports after the test session ends: junit & jtl. The junit report contains data which is compatible with any junit parser, while the jtl report contains data in Apache Jmeter jtl format.
The Download JTL report & Download Junit report checkboxes are used for configuring whether or not reports should be downloaded. By default, reports are downloaded to ${TEAMCITY_AGENT_HOME}/work/<unique-build-id-assigned-by-teamcity>. The user can override this path in the task configuration(Path to JTL report & Path to Junit reportfields), each with absolute and relative paths. TeamCity variables can likewise be used in paths.
Configure your proxy server settings in TeamCity
1. Set up proxy on teamcity server;
Add to $TEAMCITY_HOME/conf/catalina.properties the following:
http.proxyHost=<IP>
http.proxyPort=<PORT>
http.proxyUser=<USER>
http.proxyPassword=<PASSWORD>
2. Set up proxy on teamcity agent(repeat on every agent, if needed);
- Edit $TEAMCITY_AGENT_HOME/bin/agent.sh
- Find $TEAMCITY_AGENT_OPTS_ACTUAL and change it to the following:
TEAMCITY_AGENT_PROXY_OPTS="-Dhttp.proxyHost=<IP> -Dhttp.proxyPort=<PORT> -Dhttp.proxyUser=<USER> -Dhttp.proxyPass=<PASSWORD>"
TEAMCITY_AGENT_OPTS_ACTUAL="$TEAMCITY_AGENT_OPTS -ea $TEAMCITY_AGENT_MEM_OPTS_ACTUAL -Dteamcity_logs=$LOG_DIR/ $TEAMCITY_AGENT_PROXY_OPTS"
- Make sure that these options are passed to the JVM;
Pass/Fail build criteria
The Plugin is using a /ci-status request for setting the build result. Depending on this request, the plugin sets one of the following statuses in the Bamboo build result:
FINISHED_SUCCESS This status is set in the following cases:
- test has no thresholds;
- test has thresholds and they were not violated;
- there were no errors in
ci-statusresponse;
FINISHED_WITH_PROBLEMS
- test was completed successfully, but there were errors in
/ci-statusresponse;
FINISHED_FAILED
- Test has thresholds and they were violated;
- TeamCity job got error on
/test/startrequest; - Test has no thresholds, but there were specific errors in the
/ci-statusresponse:"errors":[{"code": 70404,"message": "Session ended without load report data","details": null}]"errors":[{"code":0,"Message":"Not enough resources"}]
FINISHED_SUCCESS and the second was FINISHED_FAILED, then the whole build is marked as FINISHED_FAILED. If the first was FINISHED_FAILED then, by default, the second won't be executed.Logging
The Plugin has a separate log file, which can simplify the debugging process in case of any issues with the running test.
bzm-log - contains the plugin-BlazeMeter server communication.
It's located in $TEAMCITY_AGENT_HOME/logs/<project-id>/<buildId>/bzm-log
Changelog
https://github.com/Blazemeter/blazemeter-teamcity-plugin/blob/master/CHANGELOG.md


