Installing a BlazeMeter agent for Kubernetes (Service Virtualization)
This article details how to install a BlazeMeter on-premise agent for Kubernetes on a server/instance behind your firewall with the goal of running Service Virtualization. BlazeMeter supports Contour as well as Istio for defining Ingress traffic. The procedure described here relies on Istio.
Service Virtualization is a use case where the Private Location needs an outbound and an inbound connection, while Private Locations for other test types need only an outbound connection. Service Virtualization uses either Istio or Contour to help route Ingress traffic into the desired pod in containers and the cluster. With Istio, you can also use the same Private Location for both Service Virtualization and Performance tests.
When adding an on-premise agent for a Private Location, you will come across commands for Docker and Kubernetes installations, which you copy and run on your machine to install the agent. Ensure that you update all environment variables according to your Kubernetes instance.
Istio overview
virtual services can use Istio to help route Ingress traffic into the desired pod in containers and the cluster.
Gateway
The Gateway serves as a load balancer configuration and as an entry point into your cluster. In the gateway, you can define ports that you want to expose and you can list different hosts (domain names) that each of the ports should handle.
Virtual Services
Istio handles traffic through the gateway. You can create resources called virtual services that serve as a bridge between the gateway and the actual services that are running on your Kubernetes cluster.
For incoming traffic that is targeting a given host name (example:
mydomain1-9090-<YOURNAMESPACE>.mocks.yoursite.com), a virtual service forwards
traffic to a specific service which then forwards it to the pod and the containers
within your cluster.
Sidecar Injection
Additionally, for any pod that you create in your cluster, Istio will inject a container that helps enforce mutual TLS traffic for anything that is going in and out of your pods.
Istio configuration
The following procedures show how to set up and validate environments on a cluster with Istio setup:
- Set up Istio
- Create a secret
- Deploy the gateway
- Deploy an agent
- Deploy an HTTP- or HTTPS-based Virtual Service
- Configure the DNS
Set up Istio
Follow these steps:
- Download the binary by executing the following shell script:
curl -L https://istio.io/downloadIstio | sh -
- Ensure that the cluster is clean. Run the following command:
kubectl get all
- Delete the projectcontour namespace if it is present. Run
the following command:
kubectl delete ns projectcontour
-
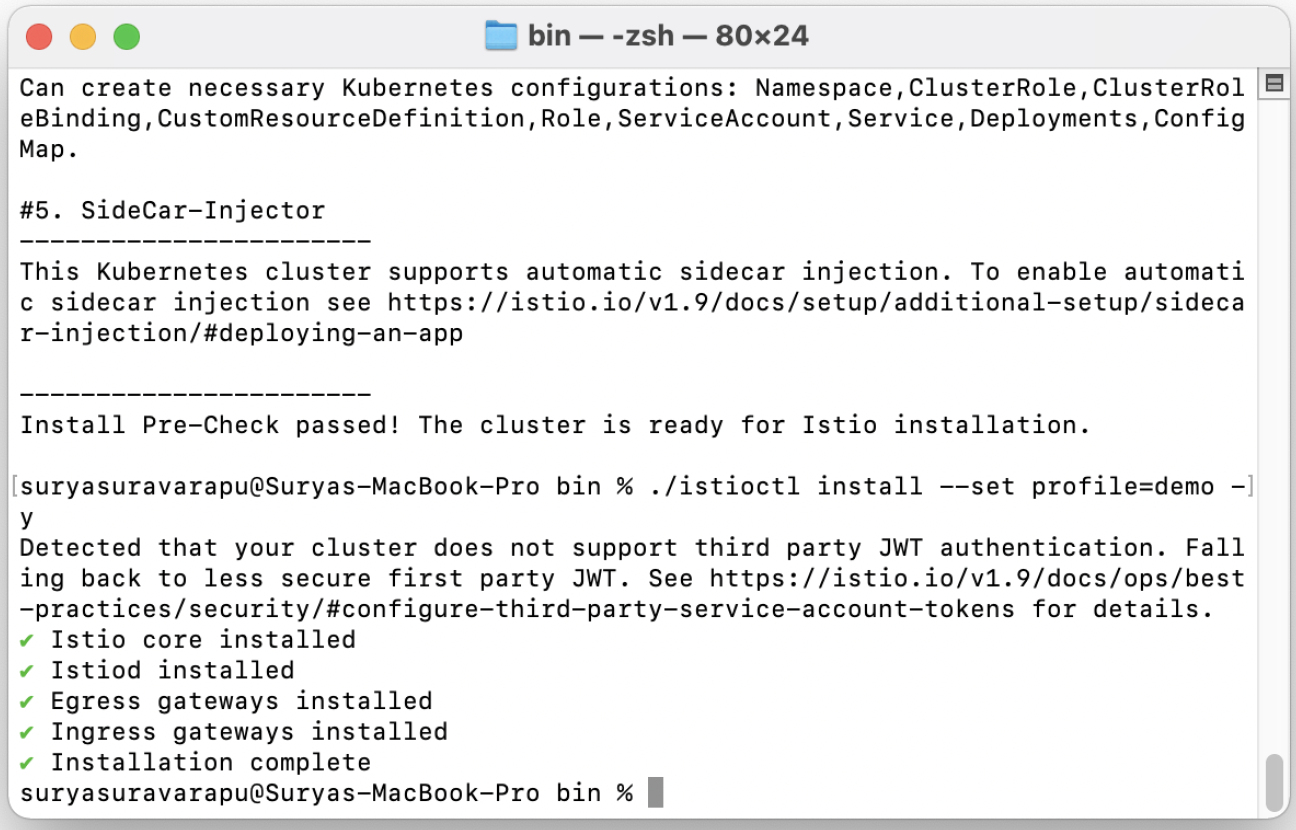
Install and set up a profile. Run the following command:
./istioctl install --set profile=demo -y
-
Enable the istio-injection for the namespace. In this example we are running on the <YOURNAMESPACE> namespace. Run the following command:
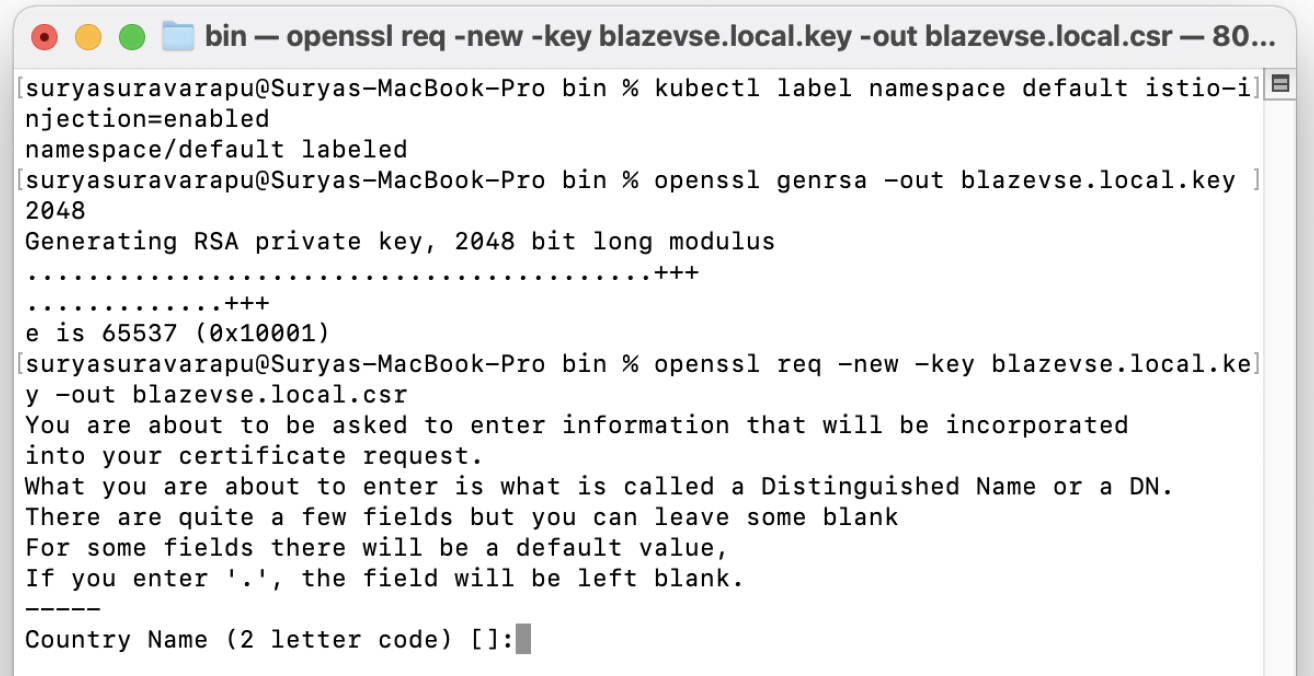
kubectl label namespace <YOURNAMESPACE> istio-injection=enabled

Create a secret
Example: *.mydomain.local, and the load balancer should have a wild card cert.
Follow these steps:
- Create a secret by running the arguments below.
- Generate a wildcard cert using openssl.
-
Run the command:
openssl genrsa -out mydomain.local.key 2048
-
Run the command:
openssl req -new -key mydomain.local.key -out mydomain.local.csr
- Run the command:
openssl x509 -req -days 3650 -in mydomain.local.csr -signkey mydomain.local.key -out mydomain.local.crt
- Run the command:
rm mydomain.local.csr
-
Create a secret in istio-system name using the wildcard certs.
You have created a secret.
-
Create a secret in the
istio-systemnamespace calledwildcard-credential.kubectl create -n istio-system secret tls wildcard-credential --key=mydomain.local.key --cert=mydomain.local.crt
Deploy the gateway
Here is a sample of the gateway file contents.
To set the istio selector in the spec, make sure it matches your ingress gateway pod labels. If you installed Istio using Helm following the standard documentation, this would be istio:ingress.
Replace <YOURNAMESPACE> by your namespace.
apiVersion: networking.istio.io/v1beta1
kind: Gateway
metadata:
  name: bzm-gateway
  namespace: <YOURNAMESPACE>
spec:
  selector:
    istio: ingressgateway # Set this to your istio default controller!
  servers:
    - port:
        number: 80
        name: http-80
        protocol: HTTP
      hosts:
      - "*"
    - port:
        number: 443
        name: https-443
        protocol: HTTPS
      hosts:
      - "*"
      tls:
        mode: SIMPLE
        # This must be located in the "istio-system" namespace
        credentialName: wildcard-credential
    - port:
        number: 15443
        name: https-15443
        protocol: HTTPS
      hosts:
      - "*"
      tls:
        mode: PASSTHROUGH
Run the following command to deploy the gateway.
kubectl apply -f <path to yaml>/bzm_gateway.yaml -n <YOURNAMESPACE>
You have deployed a gateway.
Deploy an agent
Follow these steps:
-
Create an agent in the BlazeMeter Private Location section and copy the Kubernetes configuration. For an example, see the example Kubernetes Command in this article.
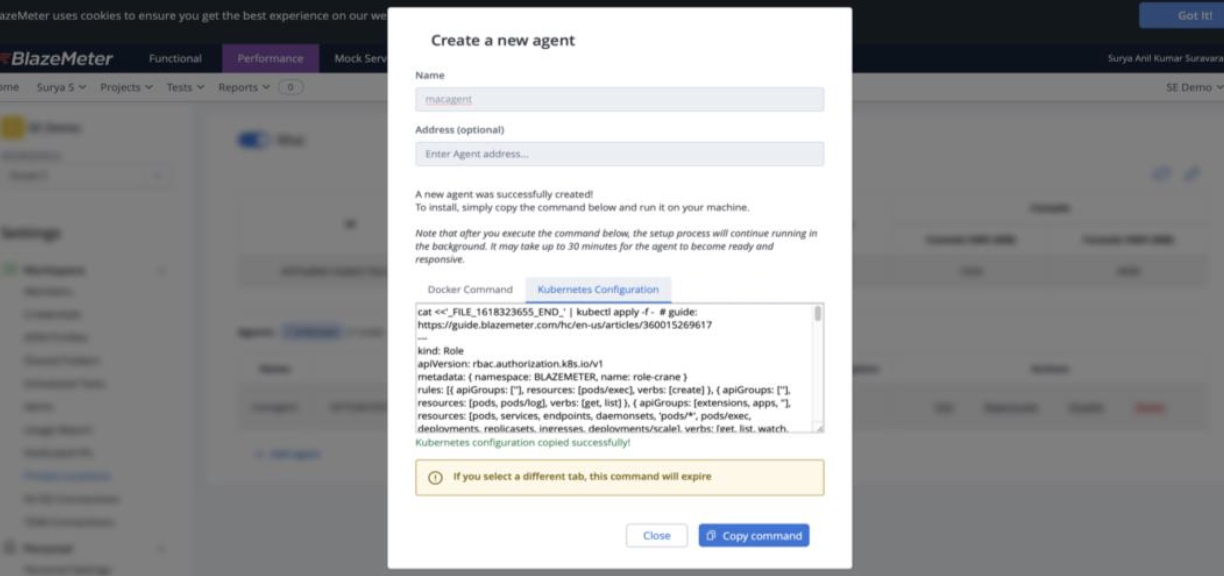
- Copy the Kubernetes Configuration agent creation command and update it or add the following:
- Enter the namespace where you want to deploy crane, in this example,
<YOURNAMESPACE>. - Update imagePullPolicy value:
imagePullPolicy: Always Add the below properties under spec of kind Deployment:
Copy- name: KUBERNETES_WEB_EXPOSE_TYPE
value: ISTIO
- name: KUBERNETES_WEB_EXPOSE_SUB_DOMAIN
value: mydomain.local
- name: KUBERNETES_WEB_EXPOSE_TLS_SECRET_NAME
value: wildcard-credential
- name: KUBERNETES_SERVICE_USE_TYPE
value: CLUSTERIP
- name: KUBERNETES_USE_PRE_PULLING
value: 'true'
- name: KUBERNETES_SERVICES_BLOCKING_GET
value: 'true'
- name: KUBERNETES_ISTIO_GATEWAY_NAME
value: bzm-gatewayThe environment variable KUBERNETES_ISTIO_GATEWAY_NAME is optional. If it is not set, the crane agent creates a gateway resource for every virtual service deployment.- Add
"networking.istio.io"as part of the roles.rules.apiGroups. - Add
"ingresses", "gateways", "virtualservices"as part of roles.rules.resources.
- Enter the namespace where you want to deploy crane, in this example,
Example:
Your final deployment-crane.yaml manifest should look like the following example. You can copy the YAML and use it as your own deployment manifest, just make sure to edit the variables auth_token, the namespace, AGENT_ID, LOCATION_ID, and so on.
# This is for defining Role
apiVersion: rbac.authorization.k8s.io/v1
kind: Role
metadata:
  namespace: <NAMESPACE>
  name: role-crane
rules:
  - apiGroups:
      - ''
    resources:
      - pods/exec
    verbs:
      - create
  - apiGroups:
      - ''
    resources:
      - pods
      - pods/log
    verbs:
      - get
      - list
  - apiGroups:
      - extensions
      - apps
      - networking.istio.io # Added for Service Virtualization ingress
      - ''
    resources:
      - pods
      - services
      - endpoints
      - daemonsets
      - pods/*
      - pods/exec
      - deployments
      - replicasets
      - deployments/scale
      - ingresses # Added for Service Virtualization ingress
      - gateways # Added for Service Virtualization ingress
      - virtualservices # Added for Service Virtualization ingress
    verbs:
      - get
      - list
      - watch
      - create
      - update
      - patch
      - delete
      - deletecollection
      - createcollection
  - apiGroups:
      - batch
    resources:
      - jobs
    verbs:
      - watch
      - get
      - list
      - create
      - update
      - patch
      - delete
      - deletecollection
---
apiVersion: rbac.authorization.k8s.io/v1
kind: RoleBinding
metadata:
  name: role-binding-crane
subjects:
  - kind: ServiceAccount
    name: default
    namespace: <NAMESPACE>
roleRef:
  kind: Role
  name: role-crane
  apiGroup: rbac.authorization.k8s.io
---
apiVersion: rbac.authorization.k8s.io/v1
kind: ClusterRole
metadata:
  name: cluster-role-crane
rules:
  - apiGroups:
      - ''
    resources:
      - nodes
    verbs:
      - get
      - list
      - watch
      - create
      - update
      - patch
---
apiVersion: rbac.authorization.k8s.io/v1
kind: ClusterRoleBinding
metadata:
  name: cluster-role-binding-crane
roleRef:
  apiGroup: rbac.authorization.k8s.io
  kind: ClusterRole
  name: cluster-role-crane
subjects:
  - kind: ServiceAccount
    name: default
    namespace: <NAMESPACE>
---
apiVersion: apps/v1
kind: Deployment
metadata:
  name: crane
  labels:
    role: role-crane
    harbor_id: <LOCATION_ID>
    ship_id: <AGENT_ID>
spec:
  selector:
    matchLabels:
      role: role-crane
      harbor_id: <LOCATION_ID>
      ship_id: <AGENT_ID>
  replicas: 1
  strategy:
    type: Recreate
  template:
    metadata:
      labels:
        role: role-crane
        harbor_id: <LOCATION_ID>
        ship_id: <AGENT_ID>
    spec:
      restartPolicy: Always
      terminationGracePeriodSeconds: 30
      containers:
        - name: bzm-crane
          image: 'blazemeter/crane:latest'
          imagePullPolicy: Always
          livenessProbe:
            failureThreshold: 3
            httpGet:
              path: /healtz
              port: 5000
              scheme: HTTP
            initialDelaySeconds: 300
            periodSeconds: 15
            successThreshold: 1
            timeoutSeconds: 10
          readinessProbe:
            failureThreshold: 3
            httpGet:
              path: /healtz
              port: 5000
              scheme: HTTP
            initialDelaySeconds: 5
            periodSeconds: 15
            successThreshold: 1
            timeoutSeconds: 10
          env:
            - name: HARBOR_ID
              value: <LOCATION_ID>
            - name: SHIP_ID
              value: <AGENT_ID>
            - name: AUTH_TOKEN
              value: <AUTH_TOKEN>
            - name: DOCKER_PORT_RANGE
              value: 6000-7000
            - name: CONTAINER_MANAGER_TYPE
              value: KUBERNETES
            - name: IMAGE_OVERRIDES
              value: '{}'
            - name: DOCKER_REGISTRY
              value: gcr.io/verdant-bulwark-278
            - name: AUTO_KUBERNETES_UPDATE
              value: 'true'
            - name: RUN_HEALTH_WEB_SERVICE
              value: 'true'
            # Additional Environment variables for Service Virtualization and Istio deployment
            - name: KUBERNETES_WEB_EXPOSE_TYPE
              value: ISTIO
            - name: KUBERNETES_WEB_EXPOSE_SUB_DOMAIN # A sub-domain of your choice
              value: mydomain.local
            - name: KUBERNETES_WEB_EXPOSE_TLS_SECRET_NAME
              value: wildcard-credential
            - name: KUBERNETES_SERVICE_USE_TYPE
              value: CLUSTERIP
            - name: KUBERNETES_USE_PRE_PULLING
              value: 'true'
            - name: KUBERNETES_SERVICES_BLOCKING_GET
              value: 'true'
            - name: KUBERNETES_ISTIO_GATEWAY_NAME # OPTIONAL: Matches gateway 'metadata>name' in gateway.yaml
              value: bzm-gateway
To deploy the agent:
-
Apply the manifest to deploy this agent.
kubectl apply -f deployment-crane.yaml -n <YOURNAMESPACE>
-
Verify the pods and other resources within your cluster namespace to ensure that the agent is running.
kubectl get all -n <YOURNAMESPACE>

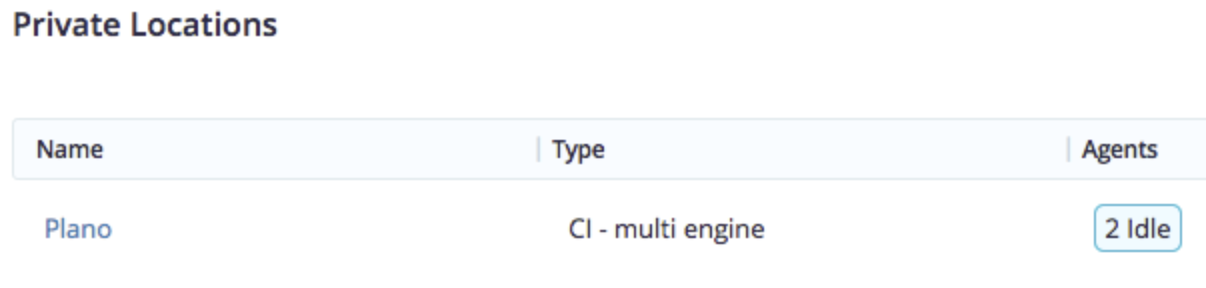
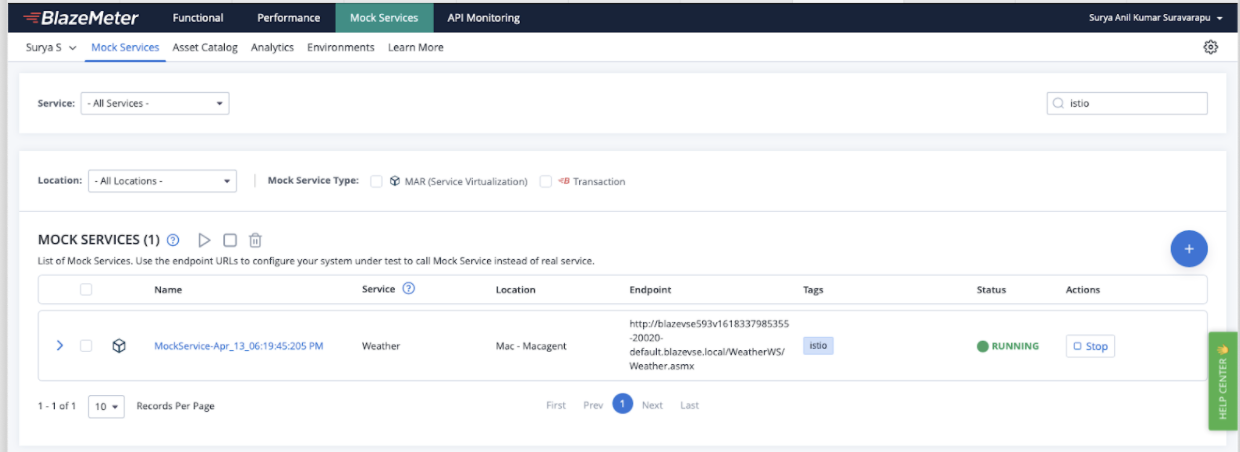
- After the agent is deployed, it will show up under the private location as shown in this screenshot:
- Verify the resources within the istio-system namespace
kubectl get svc -n istio-system
kubectl get secret -n istio-system
Make sure we have the loadbalancer service running with an active external IP.
Verify that the secret named wildcard-credential is set up.

- To verify Istio deployments within your active namespace, run the following commands:
kubectl get gw -n <YOURNAMESPACE>
Verify that the bzm-gateway is deployed within your namespace (same namespace as that of crane)

After all resources within your cluster are set up, you can start deploying virtual services.
Deploy an HTTP or HTTPS based Virtual Service
The virtual service creates an Istio virtual service in the namespace. You can verify the virtual service in your namespace by using the following command:
kubectl get virtualservices -n <YOURNAMESPACE>
Note: Stopping or deleting a virtual service deletes the Istio virtual service.
- Navigate to the Virtual Service tab in the BlazeMeter UI.
- Create a virtual service with a set of transactions, and select the Kubernetes private location agent (the agent we created with this configuration) in the Private Location.
- After the virtual service is created, click on the save and start button to run the virtual service.
- The endpoint should be visible in the UI with the FQDN ending the subdomain. In this example, it is:
"Mydomain.local"
- The format of your virtual service endpoint should look like this:
mockserviceName&ID.namespaceName.mydomain.local
Configure the DNS
If you cannot connect to the virtual service endpoint, it is likely due to failing DNS resolution. The DNS resolution for the generated virtual services URLs/endpoint is not anything that Service Virtualization or Crane can set up automatically.
The missing piece is that the systems from which you are running HTTP/S requests don't have any DNS records that map traffic of the generated subdomains. You resolve this issue by adding the DNS entry of the external IP of the loadbalancer to the hosts file of the system which is used for hitting the virtual service endpoint.
For example, let's say the generated URL is mockservice232297-8080-<YOURNAMESPACE>.mydomain.local and the external IP of the loadbalancer is 34.72.180.232,
then add the following to your /etc/hosts file:
34.72.180.232 mockservice232297-8080-<YOURNAMESPACE>.mydomain.localYou can now reach the virtual service endpoint at mockservice232297-8080-<YOURNAMESPACE>.mydomain.local
Now that you have an Agent installed, continue reading how you use your new Private Location.