Create a virtual service
In BlazeMeter, you can create a virtual service from transactions, from a recording, or from a template.
Use one of the following ways to create virtual services:
- From transactions
- From recording
- From template
- From Blueprints Library
After creating virtual services, set up transactions:
- Complete the configuration of your virtual service
- Add transactions to the service
- Include/exclude transactions in a virtual service
- Modify transactions in a running virtual service
- Define the priority of multiple matching transactions
After setting up transactions, configure optional properties:
- Configure runtime properties
- Group multiple virtual services under a single endpoint
- (Optional) Virtualize message queues
Create a new service from transactions
In BlazeMeter, a "service" is the representation of the underlying live service, and it serves as a container for transactions. You first create a service, and upload transactions into the service.
Having a least one service with transactions is a prerequisite for creating a virtual service. If you already have a service, jump directly to Create a virtual service from an existing service.
Follow these steps:
- Navigate to the Service virtualization tab and click Virtual services.
- In the Virtual services tab, click the Plus button to create a virtual service, and select Create from transactions.

A new row is added to the top of the Virtual services list. - Enter a name for the virtual service in the Name field.
- Click the arrow next to the virtual service name to expand the details for the virtual service.
- (Optional) Enter a Description for your virtual service.
- (Optional) Select a configuration. If needed, define attribute-value pairs for your environment variables on the Configurations tab.
- (Private location only) Under Create log, enable or disable logging on the private location. To learn more, see Running virtual services on private locations.
-
Drag your transaction file into the upload area, or click the Upload area to browse to the file. Select a file that contains the transactions for your virtual service. To upload multiple Swagger files using a zip file, the main file in the zip file must be named index.json or index.yaml for the upload to work.

The Import transactions dialog opens.
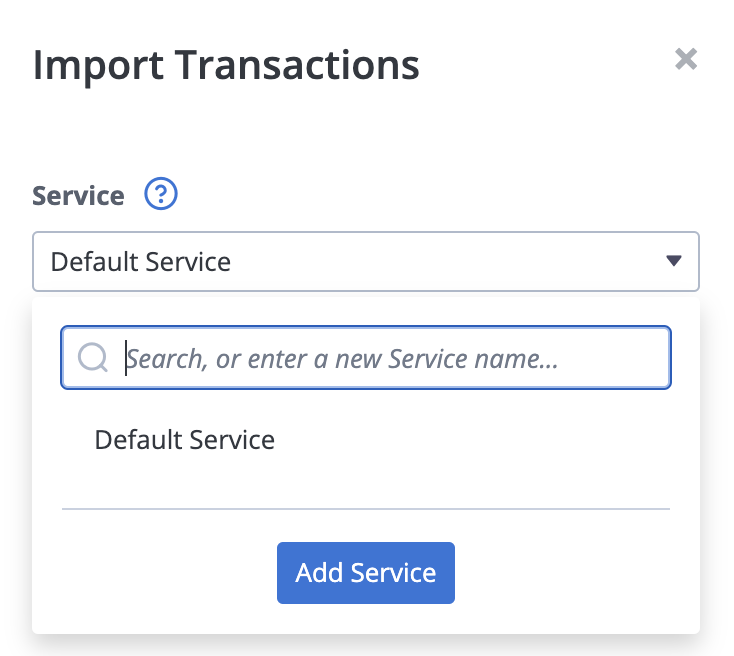
- Select the service you want to add these transactions to. The service is a representation of the underlying live service, and it serves as a container for the transactions you will upload.
- If an existing service contains transactions that are needed for this virtual service, select the existing Service.
- Or create a new service:
- Click Add service.
- (Optional) To assign one or more tags, type the tag name(s) in the Tags field and press enter.Tags make transactions easier to identify, especially within a large service. You can provide tag definitions here to apply the defined tags to all imported transactions. Or you can define tags at the transaction level after import. To enter multiple tags, press enter after each tag name.
- Click Import.
Create a virtual service from an existing service
In BlazeMeter, a "service" is the representation of the underlying live service, and it serves as a container for the transactions. In this scenario, you create a virtual service by selecting an existing service that already contains the transactions that you need for your virtual service.
Follow these steps:
- Navigate to the Service virtualization tab and click Virtual services.
- In the Virtual services tab, click the + button to create a virtual service, and select Create from transactions.
A new row is added to the top of the Virtual services list. - From the Service drop-down list, select the service that contains the transactions that you need for your virtual service.
Create virtual services using the HTTP recorder
You can record a series of interactions from your browser, capture those interactions as transactions, and create a virtual service based on those transactions. To learn more about the BlazeMeter HTTP recorder, see Record HTTP transactions
Create a virtual service from a virtual service template
A requirement for this way of creating virtual services is that you create a virtual service template.
At any time after saving the template, click Create virtual service to the right of the template name to dynamically provision a virtual service that includes the transactions in the template.
- Go to the Virtual service templates tab.
- In the Actions column, click the Create virtual service button.

Your virtual service is created, and you can find it in the Virtual services tab.
Other template actions include:
- Assign a template to a virtual service
- Create a virtual service template from a virtual service
To learn more, see Creating a virtual service template.
Create a virtual service from the Blueprints Library
Use the Blueprints Library to start from predefined API blueprints. This is useful when you want a ready-made set of transactions for common providers or scenarios instead of building transactions from scratch.
Follow these steps:
- Go to the Service virtualization tab and click Virtual services.
- In the Virtual services tab, click the Plus button to create a virtual service, and select Create from Blueprints Library.
The Blueprints Library catalog opens, showing available API blueprints organized by category. - Filter by category or search by keyword to find a blueprint that matches your needs.
- Select a blueprint card to review its included endpoints and description.
- Click Add to proceed with creating a virtual service from this blueprint.
- Choose where to place the generated transactions:
- Create a new service, or
- Add to an existing service.
- Click Import.
- Review the generated transactions in the service and adjust matchers or responses as needed.
The selected blueprint creates reusable transactions in your service so you can immediately validate API behavior and iterate on the mock service configuration.
Complete the configuration of your virtual service
After you have created a virtual service using one of the above methods, complete its configuration.
- In the Name box, enter a name for the virtual service.
- Click the arrow next to the virtual service name to expand the details for the virtual service.
- (Optional) Enter a Description for your virtual service.
- (Optional) Select a Configuration. If needed, define attribute-value pairs for your environment variables on the Configurations tab.
- (Private location only) Under Create log, enable or disable logging on the private location. To learn more, see Running virtual services on private locations.
- In the Location drop-down list, select the location that you want to deploy your virtual service to. Select from the available Google Cloud Platform locations (US East or EU West) depending on your location. Or select a private location.
- From the Endpoint drop-down, select either HTTPS or HTTP. The default is HTTPS.
- (Optional) To run the virtual service in a private location, select a preferred port in the Port field.
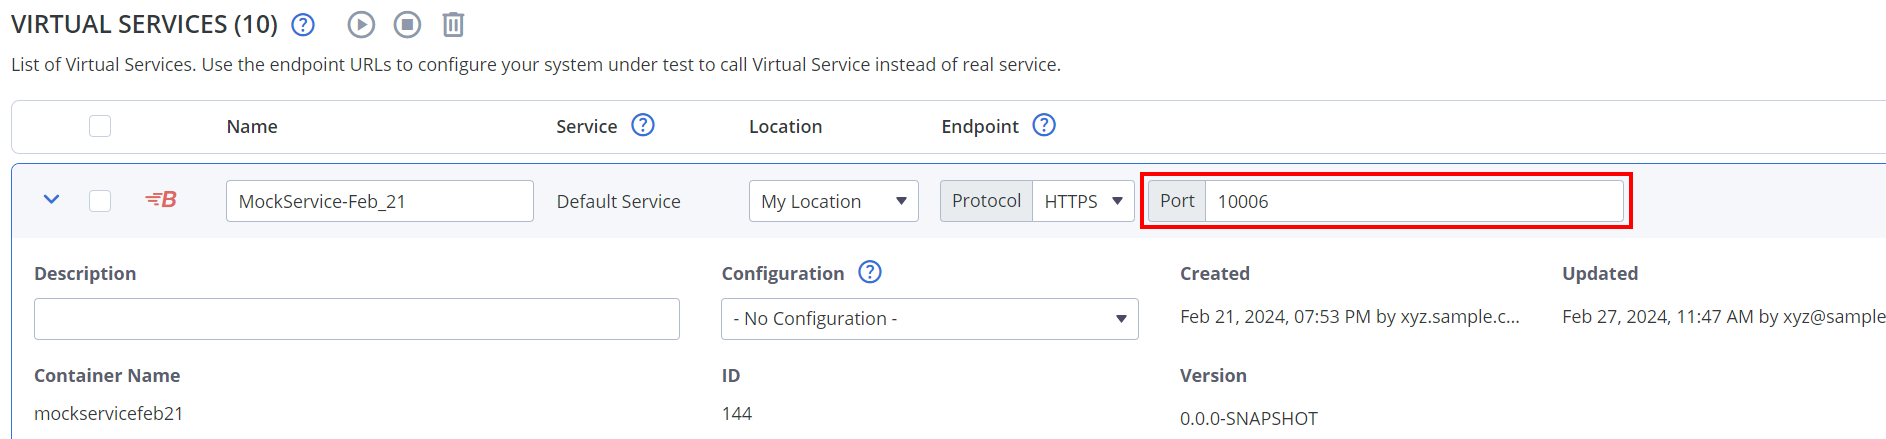
To learn more about preferred ports, see Select a preferred port. - Under Runner, leave the default HTTP Runner.
To learn more about the optional Messaging runner, see Virtualizing message queues.
Add transactions to the service
To add transactions to a service, you can upload additional transactions directly on the Service virtualization tab without having to switch tabs. Drop a file into the upload area or click the Plus button to create new transactions.
To learn more about supported transaction file formats, see Add transactions from file.
To learn more about recording HTTP transactions, see Record HTTP transactions.
To learn more about the optional Messaging runner, see Virtualize message queues.
Include/exclude transactions in a virtual service
After you have added transactions to the service and have created a virtual service, the next step is always to select the transactions for this virtual service and define their parameters.
On the Transactions tab:
- Select transactions that you want to include. You have several options:
Search and filter transactions in the columns by entering a tag or search text.
To select all transactions visible in the column (not all transactions in the service), click the check box in the column header.
- Or, manually select checkboxes in the columns.
-
Move selected transactions from the Other transactions in your catalog column to the Transactions in this virtual service column.
You have several options how to do this:- Click the Right arrow to move selected transactions from Other transactions in your catalog column to the Transactions in this virtual service column. Select checkboxes in the Transactions in this virtual service column and click the Left arrow to remove these transactions from the virtual service.

-
Use the quick action to move selected transactions with a single click: Click the Include this transaction in the virtual service icon in the left column. To remove a transaction from the virtual service, click the corresponding Remove this transaction from the Virtual service icon in the right column.
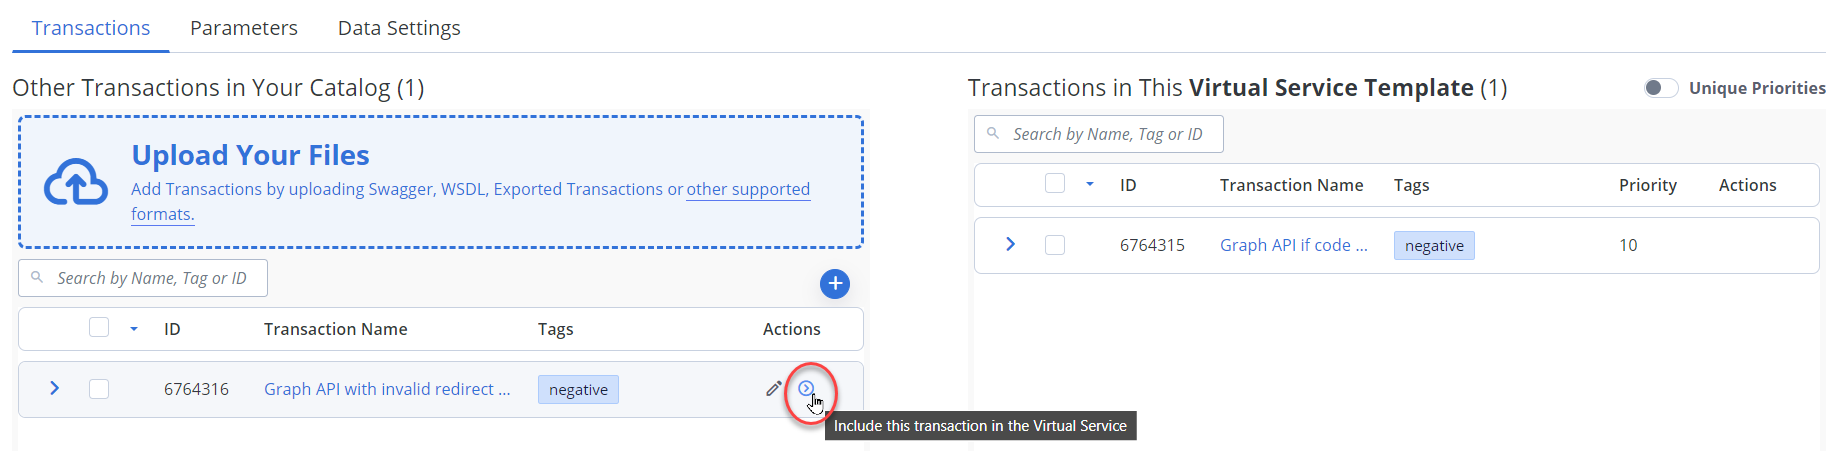
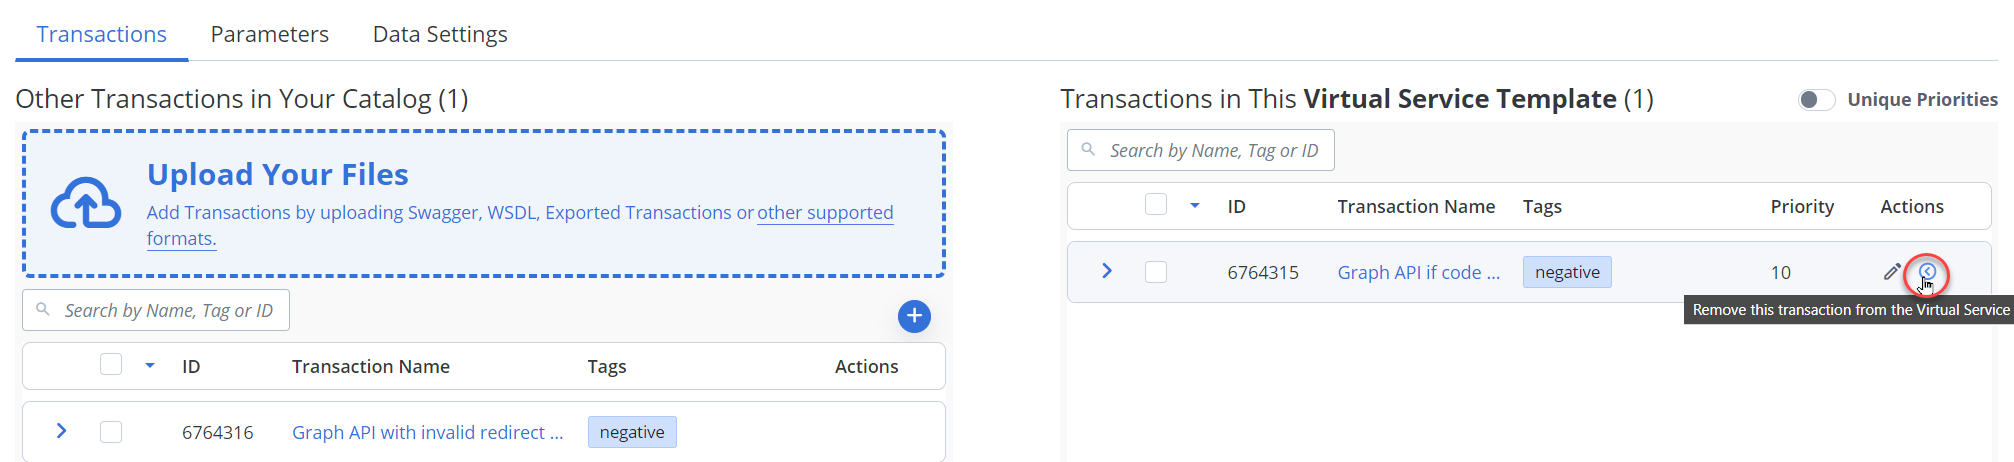
- Click the Right arrow to move selected transactions from Other transactions in your catalog column to the Transactions in this virtual service column. Select checkboxes in the Transactions in this virtual service column and click the Left arrow to remove these transactions from the virtual service.
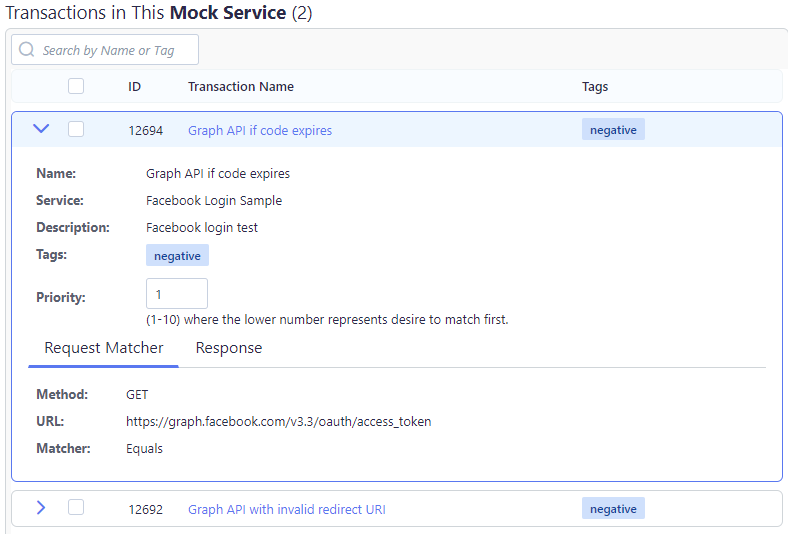
- (Optional) In Transactions in this virtual service column, expand each transaction and define a Priority to control the matching order when a request matches multiple transactions. The transaction with the lowest priority number matches first. For details, see Priority of multiple matching transactions in a virtual service.
On the Parameters tab:
- (Optional) In the Think time section, define an artificial delay between the request and the response. To learn more, see Simulating irregular response latencies.
Default: "No delay". - (Optional) In the No matching requests section, choose the expected behavior for when a request against the virtual services does not match any of the provided transactions. The request can either throw an error or be redirected to the live service.
Default: Return no match found (404) - (Optional) In the Proxy section, define a proxy to connect to the live system endpoint.
Default: No proxy- Proxy URL
- Username
- Password
- Certificate — Upload or select a certificate needed for the connection.
- No proxy — Provide a comma-separated list of URLs to exclude from this proxy.
- (Private locations/Docker only) Select an Keystore & Truststore Override. To learn more, see Running virtual services on private locations.
- (Optional) Define Rate Limits to simulate server response 429:
too many requests.- Rate Limit (req/s) — Define a simulated rate limit after which the mock service will reject further requests. Or leave empty to disable the rate limit.
- Burst Size — Define the maximum burst capacity or leave empty for no burst allowance.
- (Optional) Define Authentication. To protect access to mocked API endpoints, you can enforce authentication at the service level.
- None — No authentication, this is the default.
- HTTP Basic — Clients authenticate with a username and password through standard HTTP Basic auth.
- Header Match — Require a specific header name and value (for example, X-Api-Key) using the familiar header matcher pattern.
- Click Save.
Your virtual service is saved and added to the list of available virtual services.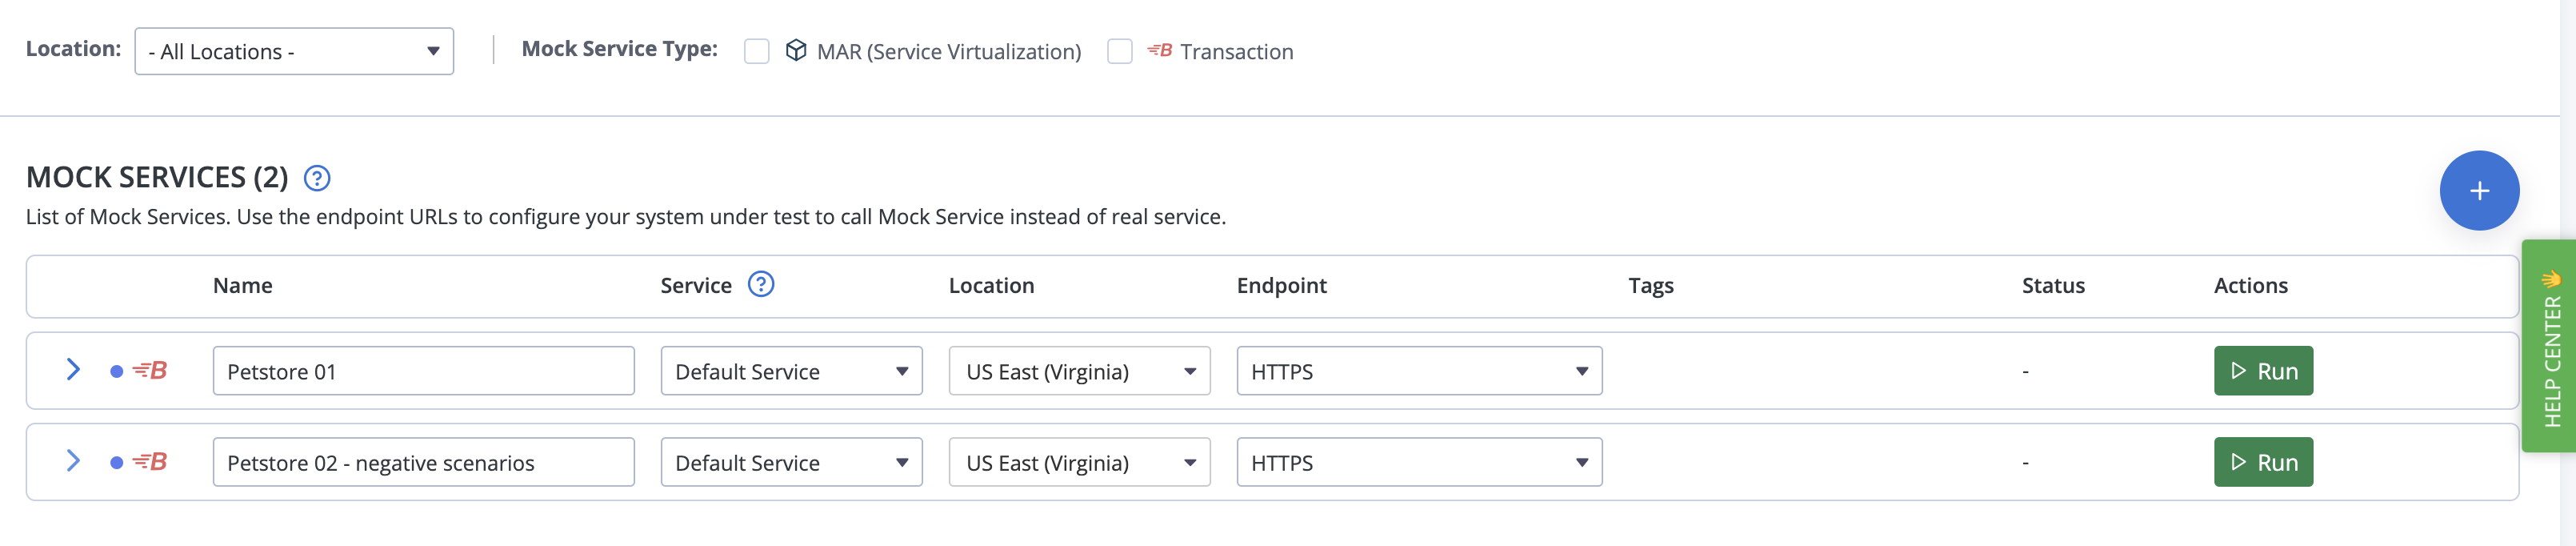
The virtual service is not active until you run it.
Click Run virtual service to run it. For information about the next steps, see Running a virtual service.
Modify transactions in a running virtual service
You can add and remove transactions or modify existing transactions without having to restart the virtual service.
- To add a transaction to or remove it from the virtual service, update the virtual service's transaction list in the virtual services tab and then click the Update button. When you run the test again, the changes will be reflected.
- To modify a transaction, make the changes and click Save in the transaction. Then click the Update button in the virtual services tab. When you run the test again, the changes will be reflected.
Define priority of multiple matching transactions in a virtual service
When you test against a virtual service, the virtual service first attempts to match incoming requests against any of its transactions. The transactions can be explicitly spelled out requests or regular expressions. When a virtual service receives a request that matches multiple transactions, the virtual service chooses the transaction with the lowest value in the Priority field.
Examples:
- Say you have a virtual service for a service that searches by zip code with two transactions. Transaction A matches a parameter value of 75024, and transaction B matches any five-digit number. You want the transaction with the more specific matching criteria (transaction A) to have the higher priority so that it matches first, and the broader matching criteria (transaction B) shall only match if the specific zip for transaction A is not entered, so you give it lower priority.
- After importing 100 transactions, they are all assigned the same default priority of 10. Fifteen of them are generic transactions that should be matched only after the more specific eighty five are matched. You don't want to have to manually change the priority level of eighty five transactions to 9. In this case, it's quicker to give the fifteen generic transactions a priority of 20, below the default of 10.
Consider this matching logic when determining which transactions to add to a virtual service, and whether one or more virtual services are required to meet your testing requirements.
Every transaction is added with the default priority level of 10.
-
To have a transactions match first, set its priority to 1.
-
To have a transactions match before another, set its priority to a lower number.
-
To have a transactions match after another, set its priority to a higher number.
-
To have a transactions match last, set its priority to 20.
You can assign the same priority to multiple transactions. Therefor it can happen that multiple matching transactions have the same priority. In this case, the virtual service chooses the most recent transaction first (the one with the highest transaction ID number). To have fine control over the priority over default transactions, assign them unique priorities. Unique priorities use an index counter that defines the order without ambiguity.
To assign unique priorities:
-
Add transactions that can match.
-
Enable Unique priorities.
The Customize unique transaction priorities window opens and a table lists all included transactions. -
Arrange the rows in order of highest to lowest priority. You can use the following methods:
-
Click the handle and drag a transaction up to increase its priority.
-
Click the handle and drag a transaction down to decrease its priority.
-
To reorder a transactions to be first, click
 Move transaction to beginning.
 -
To reorder a transactions to be last, click
Move transaction to end. -
To reorder multiple transactions, enable their checkboxes and click the
Move transaction to beginning or Move transaction to end button (respectively) above the table. -
To reorder priorities after Unique priority has been enabled, click the Customize button.
-
Configure runtime properties
(Optional) To optimize the performance of your virtual services, adjust their runtime properties. Go to Virtual services and open the Virtual service tab, and go to the Runtime properties tab.
-
Show Logs
-
Show logs enabled - Choose whether you want to capture runtime logs. Setting this to false can improve performance by approximately 5%.
-
Show logs max size - Specify the maximum amount of logs to be captured. Enter a number between 0 and 100.
-
-
Static response caching
-
Caching enabled - A static response is a response that uses no dynamic templates in its body or headers. If you cache static responses, repeated requests for the same styatic content are served faster, which increases the response time and performance of transactions with large response body sizes. On the other hand, it also increases the resource consumption while the virtual service is idle. Disabled by default.
-
-
Secrets
-
Secrets enabled - Enables or disables the Secrets functionality for this virtual service. Use this feature to avoid hard coding API keys, passwords, and similar into your test scripts. Enabled by default.
-
-
Inspection data
-
Inspection data enabled - Choose whether you want to capture inspection data. If you enable it, configure the following fields:
-
Max number of stored inspection data requests - Enter a number between 0 and 100.
-
Inspection data max requests per second - Enter a number between 0 and 5.
-
Inspection data max actions per second - Enter a number between 0 and 50.
-
Inspection data max body size - Enter a number in bytes between 0 and 10,240,000 (10MB).
-
-
Matcher logs
-
Console matcher logs enabled - Enabling this setting can significantly decrease performance. Default is false.
-
Show logs matcher logs enabled - Enabling this setting can significantly decrease performance. Default is false.
-
Matcher logs cache max size - Enter a number between 1 and 1000.
-
-
Scripting
-
Scripts enabled - Enable or disable processing of JavaScript in templates. Default: true.
-
NodeJS Enabled - Enable or disable NodeJS processing of JavaScript in templates. Always disabled for cloud locations. Default: false.
-
-
Web Server Configuration
-
Web server container threads - (Optional) Define the number of threads in the web server container. Enter a value between 12 and 1000. The default value for web server threads is the number of processor cores × 32.
-
Request timeout - Enter a number between 0 and 300000 milliseconds.
-
Group multiple virtual services under a single endpoint
(Optional) If you are running multiple virtual services across different Services, and the requirement arises that you need to run them under a single endpoint and port, you can group them.
- Go to Virtual services and open the Virtual service groups tab.
- Click the blue plus button to create a virtual service group.
- Give the group a name and description.
- Select a Location.
- Select an Endpoint protocol.
- Define an Endpoint port.
- (Optional) Define tags.
- On the Virtual services tab, click Assign virtual service to add one or more virtual services to the group.
- On the Parameters tab, optionally, configure SSL authentication.
Now, under Actions, click the green Run button to run this group under a single endpoint.