Managing configuration with environments
An Environment is a group of configuration settings (initial variables, locations, notifications, integrations, etc.) used when running a test. Every test has at least one environment, but you can create additional environments as needed. For common settings (base URLs, API keys) that you'd like to use across all tests within a bucket, use a Shared environment.
Environments are great for cases when you need to re-use the same set of test steps with different configurations e.g. executing the same test against your local dev version of an API as well as the live production version.
- Multi-environment test configuration example
- Select and manage environment settings
- Test-specific environments
- Shared environments
- Inheriting from shared environments
- Default environment
Multi-environment test configuration example
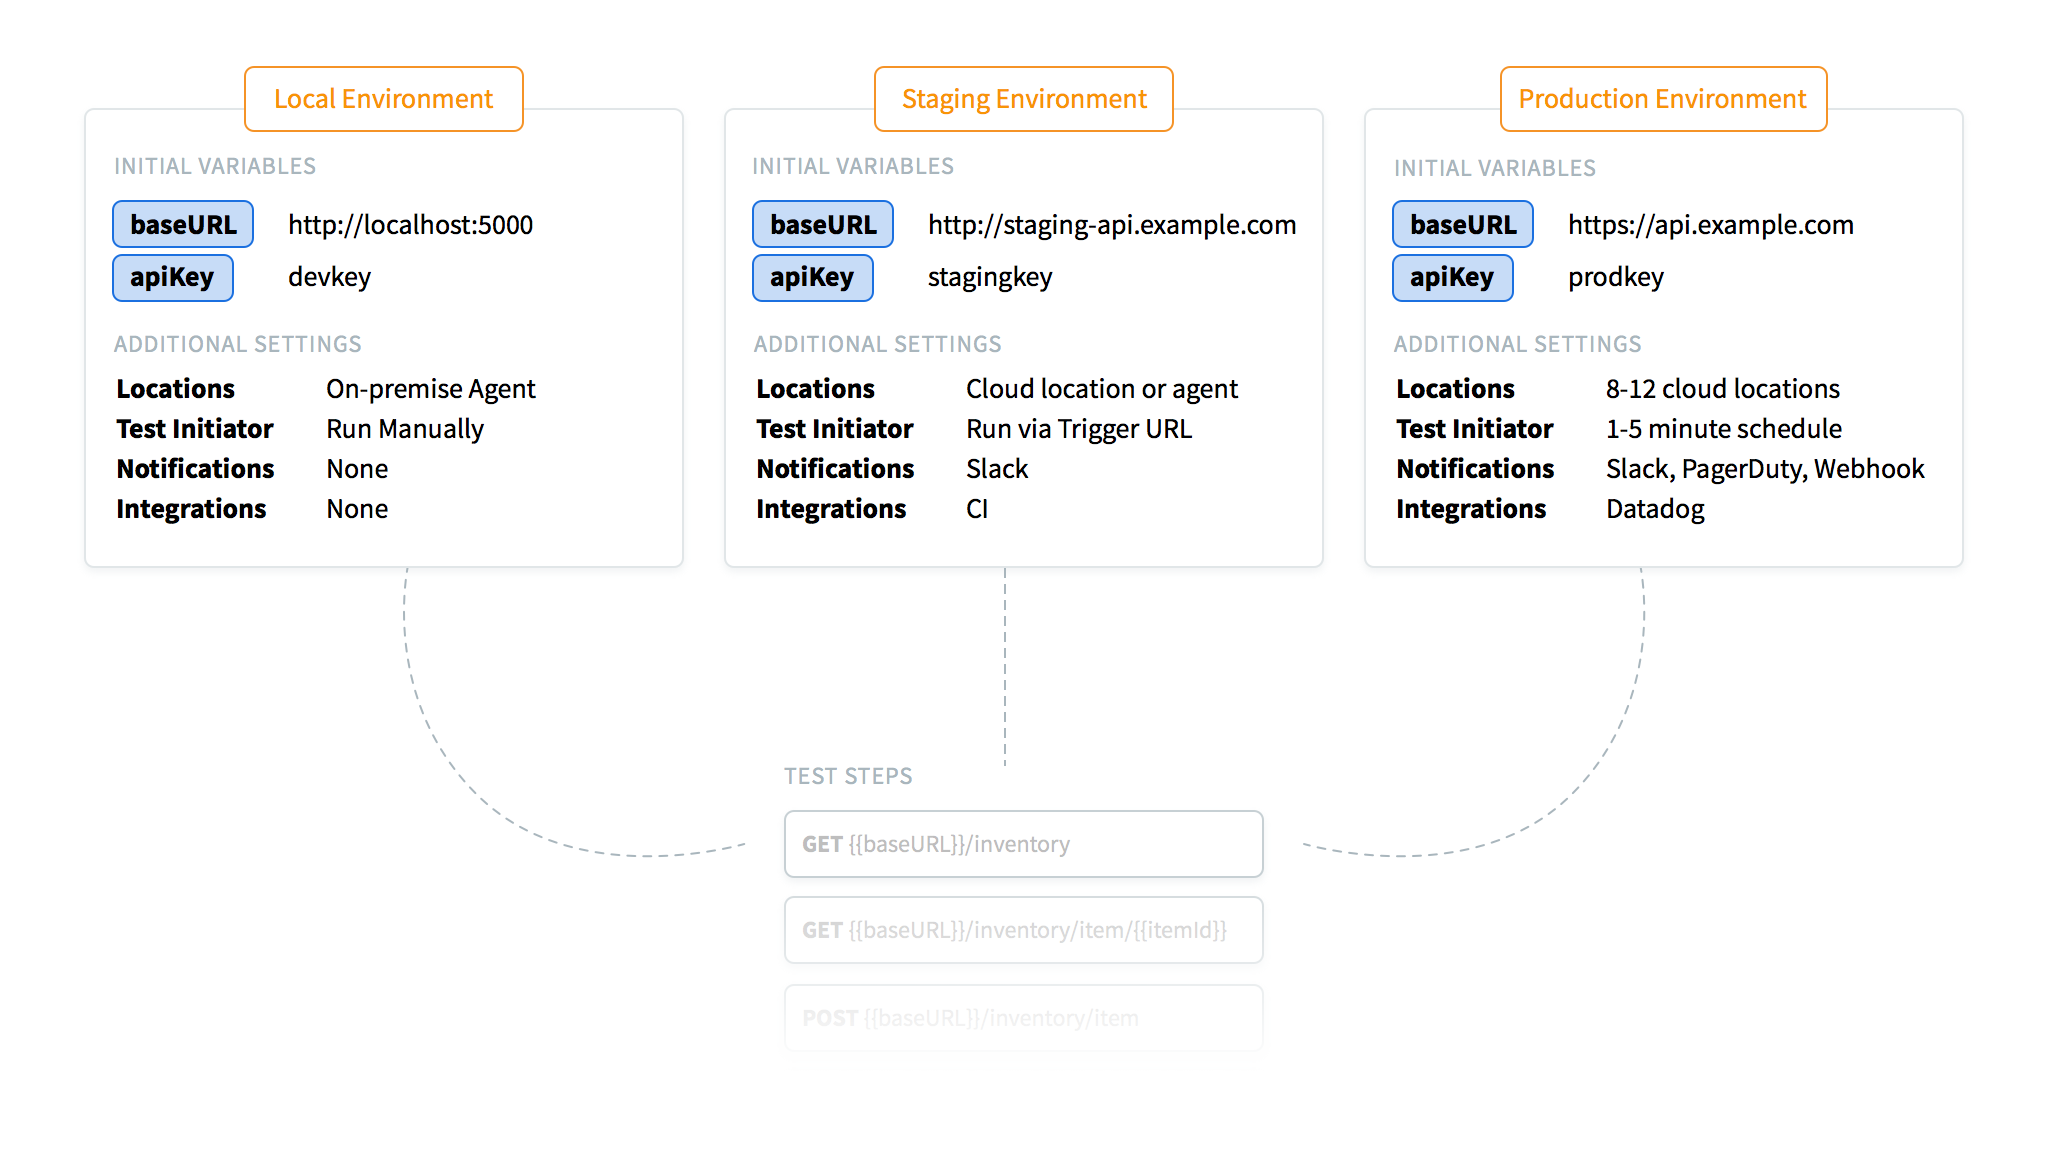
Here is an example of environment settings for a test that re-uses steps across three different environments: your local dev environment, a staging server, and a production realm.
Select and manage environments
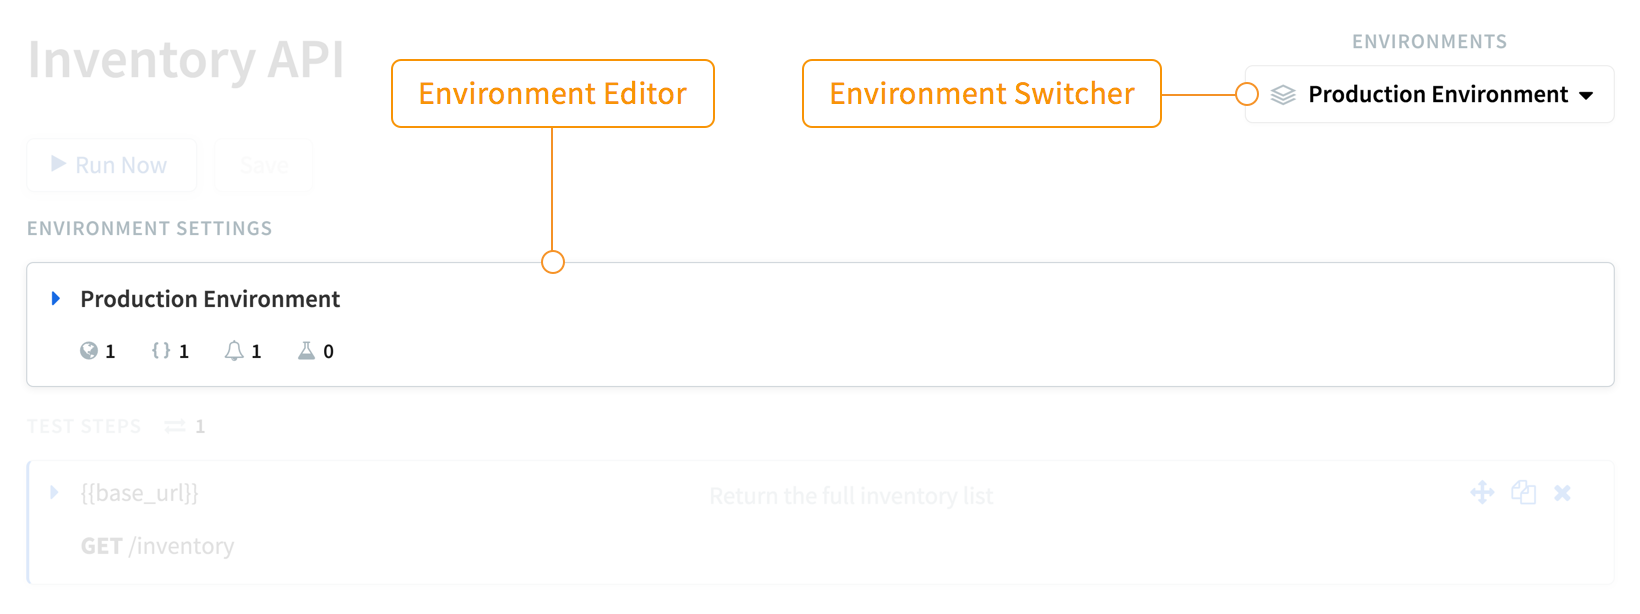
There are two primary places you will interact with your environment settings: the environments switcher (top right of the test editor) and the environment settings editor (above the test steps in the test editor). The switcher determines the current environment you are working with. When you switch between environments, the values in the settings editor will be updated to reflect the currently selected environment.
The environment switcher is where you create and delete environments. Create an empty environment by selecting Add Environment or alternately select Duplicate to create a copy of an existing one.
Test-specific environments
Test environments belong to a single test. They can optionally inherit settings from a shared environment, overriding variables and other settings specific to the test. The following settings are included in an environment:
- Initial variables
- Initial scripts
- Locations and agents
- Email and webhook Notifications
- 3rd-party notification and analytics Services
- SSL verification and cookie handling behaviors
- Environment headers and authentication
- Proxy setup
Shared environments
Shared environments belong to a bucket and can be used by any test within the same bucket either on their own, or via a test-specific environment set to inherit its settings.
Inheriting from shared environments
When a test-specific environment is set to inherit from a shared environment, the shared environment is used as a base that the test environment builds on. Depending on the setting, you may be able to override settings in inheriting test environments:
Initial variables and initial scripts
See Evaluation order of initial variables.
Pre-request and post-response scripts
You can run pre-request and post-response scripts at the environment level, the test level, and the test step level. For more information, see Pre-request scripts and Post-response scripts.
Authentication
Authentication settings in the shared environment can be overridden by test environment settings.
Headers
Headers in the shared environment with the same name as those in a test environment will be overridden by those in the inheriting test environment.
Behaviors
Behaviors that have their default values changed in a shared environment cannot be toggled in the inheriting test-environment. Otherwise, they can be toggled On or Off. The default values for behaviors are:
- Retry on Failure - Off
- Stop on Failure - Off
- Use Cookies - Off
- Validate SSL - On
-
HTTP version support - HTTP/1 only. Can be changed to HTTP/2 only or HTTP/2 compatibility
-
Force h2c - Off
-
Advanced Diagnostics - Off
For more information, see API Monitoring test behaviors.
Locations and agents
Locations and agents that have been enabled in a shared environment cannot be disabled from an inheriting test environment. Additional locations and agents can be enabled for the specific test environment.
Email notifications
If email notification settings are specified in a shared environment, inheriting test environments can add to the list of team members to receive notifications, but cannot override the frequency or turn off notifications to team members specified in the shared environment.
Email notifications can be sent to:
- Individual team members
- Custom email addresses (non-member emails, external emails, or distribution list emails)For APIs, see APIs for email notifications to custom emails.
The custom emails feature requires a qualifying plan. Check your plan or contact Sales to get started.
Add custom email domains to email notification domain allowlist
Prerequisites: You must be a team owner.
Follow these steps:
- In API Monitoring, click your profile on the top-right and select Teams & Usage.
The Settings & Usage page opens. - Scroll down to the Email Notification Domain Allowlist section.

- Enter a list of domains.
The team members can use the list when adding custom emails for Email Notifications in Bucket Settings.
Note: Make sure the domains are comma-separated and without spaces. - Click Add Custom Email Address.
- Enter an email address and a description.
- Click Save Changes.
Add a custom email address
A team owner can add distribution lists or external email addresses from the Dashboard teams page.
Prerequisites: You must be a team owner.
Follow these steps:
- In API Monitoring, click Bucket Settings in the top right corner.
The Bucket Settings page opens. - Scroll down to the Custom Email Addresses section.
- Click Add Custom Email Address.
- Enter an email address and a description.
- Click Add New Email.
The custom email that you added will show on the test settings page under the custom email notifications column. To send test notifications to the email address that you added, see Configure email notifications.
When you add a new email address to a bucket, it will be added at the Bucket level and the Team level. If you then add the same email address to a different bucket, it will be added to that bucket only.
To delete a custom email address from a bucket, go to Bucket Settings, Custom Email Addresses and click the x next to the email that you want to delete. The email will be removed on the bucket level. The email is also deleted from any tests that are in the bucket.
Configure email notifications
You can configure email notifications so that test results are sent to custom email addresses (non-member emails, external emails, or distribution list emails).
Prerequisites: You must be a team owner or a user with permissions to modify buckets.
Follow these steps:
- In API Monitoring, click Environments on the top right.
A page with a list of test environments opens. - Click an environment.
- From the menu on the left, click Email Notifications.
You can see two lists:- Emails of team members
- Custom email addresses.
- Select one or more emails.
- Below the list, select the frequency of notifications.
- Click Save in the top left corner.
Notifications will be sent to the custom email addresses you have selected.
Webhooks
Callback URLs specified in the shared environment will be called in addition to the callback URLs specified in the inheriting test environment.
Integrations
Connected services enabled in the shared environment cannot be disabled in the inheriting test environment. You can enable additional integrations in the per-test environment.
Test data
If you are using a CSV data file, your test data variables and data settings cannot be changed in the inheriting test environment.
Proxy setup
Traditionally, BlazeMeter's Radar agent is required to route API tests through your internal network, especially when testing from secure environments or behind firewalls. This setup involves deploying the Radar agent on the same system that has access to your internal infrastructure, ensuring that API requests can securely reach the desired endpoints.
By setting up a proxy, you no longer need to rely solely on a Radar agent. The custom proxy setup allows you to route requests through a specified proxy server, ensuring that you can test APIs from various environments, including both HTTP and HTTPS endpoints.
Here's how to configure it:
-
Navigate to Test Settings for the test you wish to configure.
-
In the Proxy setup section, toggle the switch to ON.
-
Configure Proxy Details:
-
Proxy Type: Select the type of proxy requests (HTTP and/or HTTPS) that should be routed through the proxy server. By default, both HTTP and HTTPS are enabled.
-
Proxy Server: Enter the hostname or IP address of the proxy server. Ensure to also include the port number in the adjacent field (for example,
localhost:9090). -
Proxy Authentication (Optional): If the proxy server requires authentication, toggle Proxy auth to ON.
-
Username and Password: Enter the user name and password required for authentication.
-
Proxy Bypass (Optional): In the Proxy bypass field, specify any hosts you want to bypass the proxy for, separated by commas. For example,
google.com, ibm.comwill ensure requests to these hosts won't be routed through the proxy.
-
-
After configuring the proxy details, click Save to apply the changes.
Default environment
Every test has a default environment for backwards compatibility. Some features do not support specifying an environment. In these cases, the default is used instead. The default environment can be set by going to a test and selecting Settings from the left navigation.
Functions that do not currently support specifying an environment and will fallback to the default are:
- Bucket-wide Trigger URLs
- Batch Trigger URLs
- Trigger URLs with an unspecified environment (missing
runscope_environmentparameter) - 'Run All Tests' button on the test list page
- 'Run Again' button on the test result page
- AWS CodePipeline test runs

