Create Browser-Based Performance tests
Browser-Based Performance Testing operates similarly to script-based performance tests, but the test analyzes browser interactions instead of running conventional scripts.
This test type has the same features as a performance test, but it uses an embedded Selenium script to execute the test directly in a browser.
Why use Browser-Based Performance tests?
Browser-Based Tests are particularly useful in the following scenarios:
- When correlation Is unavailable or infeasible: Cases where auto-correlation plugins cannot be used due to proxy settings or other restrictions, making manual UI recording a practical alternative. For example, many organizations have security policies that prevent the use of auto-correlation plugins and traditional JMeter scripts.
- Complex UI testing: Applications with dynamically generated UI elements where element names or HTTP calls are unknown.
- Limited resources: Users who lack the time, skills, or access to write or manage complex test scripts.
Prerequisites
To edit Browser Performance Tests, you must understand the following concepts: Objects (GUI elements such as buttons and fields), Actions (such as click or select), and Group Actions.
When using a Private Location, you need to only enable the Performance functionality to use Browser Performance Tests.
Create a Browser Performance test
Follow these steps:
- From the Home screen, click the Performance tab.
- Click Create Test.
- Select a project.
-
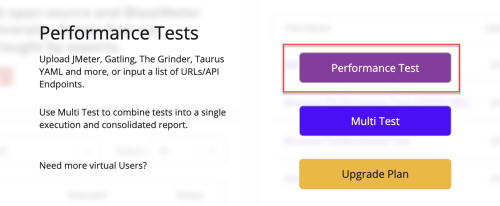
Click Performance Test.

- Click Define Test Scenario.

- Define your Scriptless test in one of the following ways:
- Start Recording test scenarios in Chrome.
Verify that you have the BlazeMeter Extension installed. For more information, see The BlazeMeter Chrome Extension.
To record test scenarios for browser performance tests using the BlazeMeter Chrome extension, ensure you are using version 6.6.0 or higher.- Click Start UI Recorder on an empty canvas.
A new browser window opens. The Chrome extension opens. - Open your web app and run your test. For more information, see Chrome Extension - Record.
- When you're done, click Stop Recording in the Chrome Extension.
- Click Run.
In the menu, click Browser Performance (Selenium).
The recorded test opens on the Test Configuration page.
- Build Step by Step test scenarios using building blocks
- Start Recording test scenarios in Chrome.
-
On the Test Configuration page, configure one or more of the following options:
- Load Configuration
- Load Distribution
- Max users per engine is currently four (4) for performance reasons. Consider allocating one CPU core per browser-based virtual user. Ensure your private location has sufficient resources before increasing the Max Users Per Engine setting.
- Virtual Services Configuration
- Failure Criteria
- APM Integration
- JMeter Properties
- DNS Override
- Network Emulation
-
(Optional) Enable Run Video Recording and choose a location. If you are using a private location, that private location is selected by default. For more information, see Private Locations.
This action enables BlazeMeter to record a video of the test run, capturing browser actions and providing visual context for any errors encountered.Each video recording consumes 100 Variable Unit Hours (VUH). - (Optional) To do a test run, click Debug Test. A debug test run does not affect metrics..
- Click Run Test.
After this test runs, review the performance report by using BlazeMeter’s tools. Filter, compare, and investigate errors, anomalies, and logs, as you would for any other performance report.
More Information
- Create Objects
- Edit Objects
- Define Scenario Steps
- Add and Modify Scenario Sections
- Create Groups
- Edit Groups
Scriptless scenario creation tips
-
To reorder steps, drag them to new locations in the scenario list.
-
To remove a step from the scenario, click the trash can button.
-
To create an editable copy, click the Duplication button
- To find objects, actions, and groups by name, use the search box.
- To view the appearance of the object in the user interface, click the Screenshot button.
Test execution settings
- Location:
You can choose a specific public cloud or private location to run the test. For more information, see Cloud vs private location and Get the location name. - Browser:
By default, the test runs in the latest Chrome browser. If you created a private location that has other browsers and versions configured, you can select specific browsers in which to run the test. For instructions, see Supported browsers. - Virtual services configuration:
If you created a virtual services configuration, you can assign it to this test.
Create objects
Objects are GUI elements in your system under test, such as text fields and buttons. When you start a new project, your object list is empty. You manage objects from the Test action library tab. To create an object, you must provide a unique way to locate the element in the DOM.
You can create objects by using any of the following methods:
- Let the BlazeMeter Chrome extension record and create objects automatically.
- Use the object picker to change an existing object.

- Create objects manually in from the test definition window.

Manually create objects:
- Add an action to the scenario.
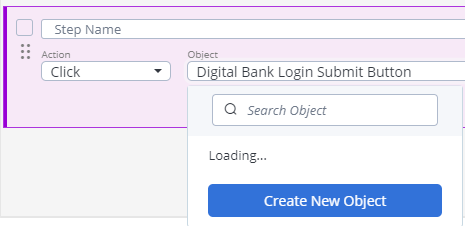
- In the Object box, click Create new object.
- Define an object name.
- In the Locator list, click one or more of the following types:
- By CSS Class
- By ID
- By Name
- By Xpath
-
In the Value field, define the locator as a text string. For example, you can enter the object ID.
- Click Create.
The object is added to the object library for this project and can be used in this test.
Edit objects
From the test action library, you can edit only the name and description of objects. Editing other object properties impacts scenarios in ways that require debugging and validation, which can be done only when the object is used in the context of a scenario.
- Find the object inside a step in the scenario editor and click the step to select it.Use the Test action library to find where the object is used if you cannot find it in a Scenario.
- Click the Edit object button (pencil icon) and modify locators manually, or click the Object picker button (arrowhead in square icon) and then click an object in the web app under test.

- (Optional) Expand and review the revision history of the object. The change log contains the time of the edit, who made the change, and a change note.
-
Make any additional changes and save the updates.
- Debug your test to verify results.
- (Optional) To save your changes to the shared test Action Library, click Override group action.
Define scenario steps
You create scenario steps out of actions, objects, and parameter values.
The Taurus actions are a predefined set. You cannot create new actions. Available actions include assertions, clicking buttons, selecting dropdown items, entering text, pausing, submitting a form, opening URLs, and many more.
For each scenario step, you can define a name, an action, an object, and values. The following example shows a test step that selects a flight departure time of 10:00 AM from a menu object.

In a test step such as clicking a button, or typing text into a form field, an action is applied to an object. Use the Object menu to search the project for existing objects or to record new objects, such as buttons.
Lastly, in the Value field, define any applicable values. A value can be, for example, a name to enter into a form field, a postal code number, a time selected from a selector, a URL, and more. Not all actions require values.
Add and modify scenario sections
Scenario sections help you gain granularity in your test data. The scenario sections you set up when creating your test show as labels in your test results. You can rename, duplicate, or delete scenario sections by opening the more options menu at the end of the row.
To add a scenario section:
-
Click the + Add scenario section button at the bottom of the scenario window. You can add as many scenario sections as you like.
-
Name the scenario section.
-
Define the scenario section by dragging actions from other scenarios to it, or add new actions from the left panel.

Create groups
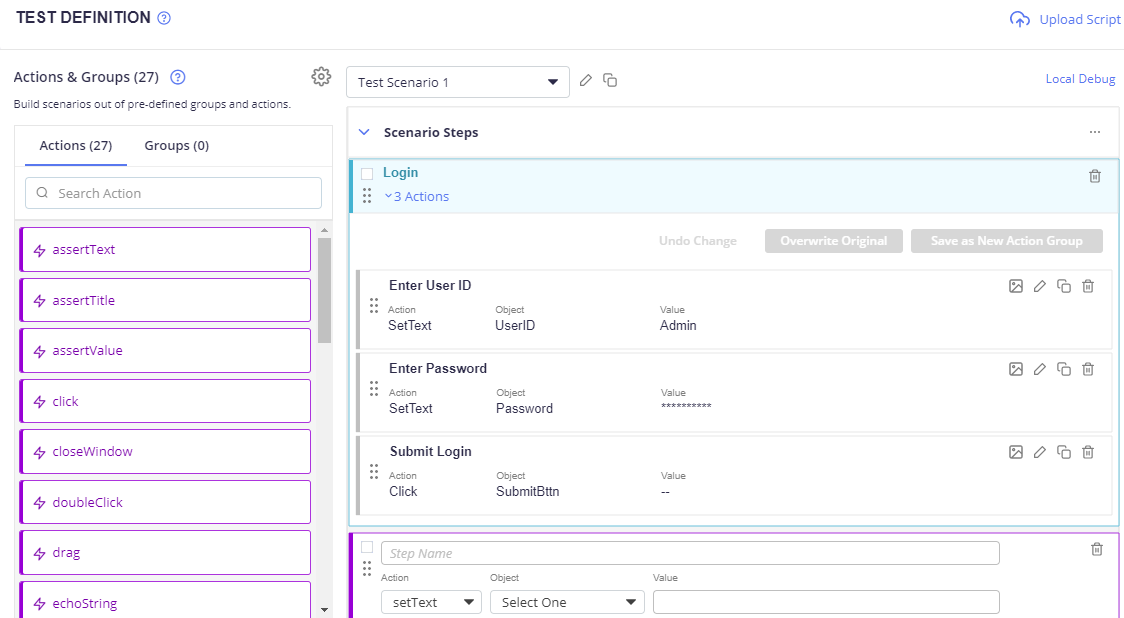
A custom group contains multiple actions that occur together in a given order. For example, you can create a custom "Login" Group that contains a sequence of three Actions, "Enter User ID," "Enter Password," "Click Submit."
Groups are useful because they can be shared, but the use of groups is not mandatory to create scenarios. You add groups to a scenario in the same way as you add single actions.
To create a group directly from the test definition, drag a sequence of actions into the scenario editor, and select their check boxes. The selected steps must be consecutive without gaps. Then enter a name for the group and click Save as group action.
You can nest groups inside other groups, but you will not be able to drill down and edit nested groups directly in the scenario editor.
Edit groups
From the test action library, you can edit only the name and description of a group. You edit the actions, objects, and values inside a groups from the scenario editor. Such local changes are automatically saved only in the current scenario.
You can overwrite the values of the original group in the test action library, or choose to save your changes as a new group in the test action library.
- Find the group in the scenario editor and expand it.If you cannot find the group in the scenario, use the test action library to find where the group is used.
- Click the Edit button (pencil icon) to edit elements of the group.
- Debug your test to validate your changes.
- (Optional) Click Override group action to save your changes to the shared test action library.
Create a Browser-Based Test
You can create a Browser-Based Test by uploading a YAML script with a Selenium executor. For more information, see Create a Taurus test.

